2017年3月18日 星期六

修正 fabric.js 在 android 移動物件時頁面捲動

最近被回報 Fabric.js 在 Android 手機上,移動物件時會造成頁面滑動。
去看了一下 fabric 的原始碼,原來他是利用 e.preventDefault() 來避免頁面捲動的。
原始碼:http://fabricjs.com/docs/fabric.js.html#line10465

   /**
     * @private
     * @param {Event} e Event object fired on mousemove
     */
    _onMouseMove: function (e) {
      !this.allowTouchScrolling && e.preventDefault && e.preventDefault();
      this.__onMouseMove(e);
    },

然後就找到這篇,原來 Chrome 為了讓瀏覽器速度變快,所以新增了 passive 參數讓 touch event 不會在 calling stack 中藉由 preventDefault() 給取消掉。而且這個參數在 Chrome 56 以後預設為 true。

window.addEventListener("touchstart", func, {passive: true} );

請見:


那麼要怎麼樣避免捲動呢?Chrome 給的答案是增加 CSS touch-action 為 none

#canvas-parent {
 touch-action: none;
}

請見: https://developer.mozilla.org/en-US/docs/Web/CSS/touch-action

2017年3月8日 星期三

[連結] 台灣金流串接程式


https://www.facebook.com/recca.tsai/posts/10154973827344181


===== 以下節錄自上面的內文 =====

說明還沒弄完整所以可能看到程式會不知道如何使用
所有的程式都依附在
https://github.com/Payum/Payum
和omnipay是一樣的功能
原作者的比較
http://stackoverflow.com/....../difference-between......
所以要使用它必須得再去了解一下 payum 如何使用
基本的使用方式
https://github.com/....../Resources/docs/get-it-started.md
另外如果是開發 Laravel 的人門檻會比較低
可以真接使用
https://github.com/recca0120/laravel-payum
==============================================
另外如果想要參考程式碼的話
大家可以只閱讀專案內的src資料夾內的 Api 結尾的程式碼
==============================================
最後 PayumTW 的程式碼不一定會是最新的
所以的程式碼會在我個人的 github 內完成後
再 folk 到PayumTW內
所以最新的程式碼請到原作個人的 github
https://github.com/recca0120/payum-ezship
https://github.com/recca0120/payum-collect
https://github.com/recca0120/payum-ecpay
https://github.com/recca0120/payum-allpay
https://github.com/recca0120/payum-mypay

[連結] Javascript 教學: JavaScript Stack from Scratch

This is a straight-to-the-point guide to assembling a JavaScript stack. It requires some general programming knowledge, and JavaScript basics. It focuses on wiring tools together and giving you the simplest possible example for each tool. You can see this tutorial as a way to write your own boilerplate from scratch. Since the goal of this tutorial is to assemble various tools, I do not go into details about how these tools work individually. Refer to their documentation or find other tutorials if you want to acquire deeper knowledge in them.

https://github.com/verekia/js-stack-from-scratch

2017年2月7日 星期二

Let's Encrypt 工作原理

把官方文件 (https://letsencrypt.org/how-it-works/) 看了一下,發現沒有正確的中文原理說明,所以來把我了解的發佈一下。

先來簡單介紹 Let's Encrypt (LE) 實際使用情況,你會在你機器上面裝一個小程式 (agent) 幫你去 LE 做申請 / 更新憑證的動作。所以這篇文章主要是講解這個小程式做了什麼事情,不然的話其實下指令就可以搞定所有事情,你不會知道中間發生什麼事。

Step 1. 產生 authorized key


這個只有 agent 第一次使用的時候會需要進行。authorized key 可以當作代表 agent 去操作 LE 的 API Key。所以我們可以說這是 API Key 產生流程。


  1. Agent 產生一組新的 key pair
  2. 通知 LE 要註冊 example.com 這個 domain
  3. LE 傳回來說可以用 DNS 驗證或是檔案驗證,2 選 1。然後以下是驗證資料
    1. 在 8303 的位址放 ed98
    2. 請將這個亂數 9cf0b331 加密
  4. 這個範例,agent 選擇使用檔案驗證。
    1. 他在 https://example.com/8303 內容放 ed98
    2. 將 9cf0b331 用私鑰加密,然後將加密結果以及公鑰一起傳給 LE
  5. LE 驗證網址和亂數都正確,這把公鑰就變成 authorized key 可以拿來操作 example.com 的憑證


Step 2. 申請 / 更新 / 註銷憑證


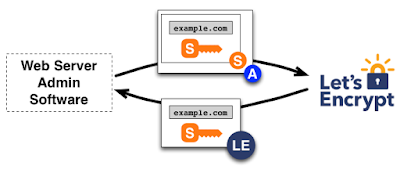
  1. 當 agent 拿到 authorized key 以後,就可以發送 PKCS#10 Certificate Signing Request (CSR) 給 LE 取得憑證。
  2. 產生一組新的 key pair
  3. CSR 裡面包含了
    1. 私鑰的 signature
    2. 公鑰
  4. 把整個 CSR 用 authorized key 加密傳給 LE
  5. LE 驗證 authorized key 以及欲申請的 domain。如果驗證通過,解開取得 CSR 之後核發憑證傳回 agent
這樣就完成取得憑證的程序。

更新以及註銷憑證的流程都類似,就不再多做說明了。